Figurative Artist Handbook: The Quarter System
[vc_row][vc_column][vc_column_text]Drawing New York is thrilled to partner with artist Rob Zeller, author of The Figurative Artist’s Handbook to offer our members a ‘serialized digest’ of his extremely popular and beautiful book. Each week we will bring you new topics and techniques relating to figure drawing so check back often.[/vc_column_text][thb_gap height=”22″][vc_text_separator title=”Establishing The Basic Proportions” color=”sandy_brown”][/vc_column][/vc_row][vc_row][vc_column width=”2/3″][vc_column_text]The Quarter System
While I agree that the head length method is a useful way to establish proportions in a figure, I personally employ what I believe is an easier method, called the Quarter System. It involves four simple steps, which, when followed with precision, produce accurate results. Review the image below while reading the steps. And, when you start to employ this method in your own drawing practice, remember to make all of these initial marks very lightly.
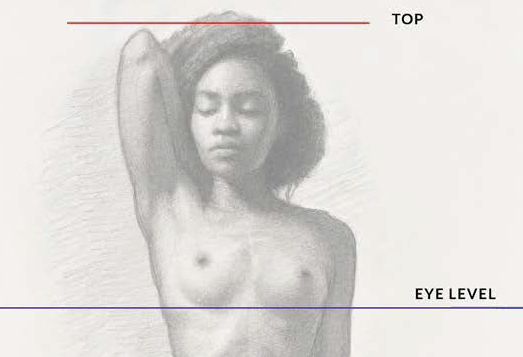
I. ACKNOWLEDGE YOUR PERSPECTIVE Account for perspective in the very beginning. Asking the right questions is key: Where is your eye level? Can you see over the top of the rib cage, or are you looking up at it? How high up is the model? Is he or she on a stand, or on the ground plane with you? Are you seated or standing? Figuring out your eye level will tell you what you are looking up at and what you are looking down on. You need to know these things to be able to draw the model correctly. In the example here, I noted my eye level. You don’t have to make such a mark on your drawingunless you are prone to forget.
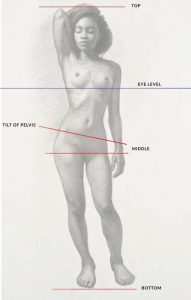
II. DEFINE YOUR PARAMETERS Make two promissory marks on the page—one at the top and one at the bottom—then place a light mark in the exact middle between those two points. In so doing, you are promising not to let the model get above or below those points. This will prevent the dreaded “run off the page” that some people experience when they do not plan out their drawing properly. These promissory marks do not have to be perfect, or in the exact spot at the top of the model’s head or at the bottom of her feet. Approximate is okay. You are looking to “place” the model on the page. The middle mark is going to help you place the center of the model within accurate proportions.
Learn to use your eyes. It’s perfectly fine to be off by a little in the initial stages. You can, and should, refine things later.
III. EVALUATE YOUR MODEL’S MIDDLE POINT Now look at the model and determine the middle point on the body. In a standing pose, with a frontal view, that point will always be on the lower third of the pelvis, just above the genitals, in a line that runs horizontally through the great trochanters and the pubic symphysis. Caution: This line is conceptual. It does not really exist! Here’s a problem that students often struggle with: Many of the things that interest them about the figure (face, breasts, shoulders, and so forth) fall above the midline. Thus they have trouble believing that two-thirds of the pelvis, the entire rib cage, and the head all sit above it. They invariably drop the midline lower to accommodate their misconception of how long the torso really is, and end up with stumpy legs on their figures. In a standing pose, the legs usually make up half the figure. There are exceptions to this rule of thumb, of course, but this is the norm. I am not a measuring fanatic. I do not think that using external measuring devices at the beginning of a drawing automatically leads to great results. I am speaking of rulers, calipers, and so forth.
IV. IDENTIFY YOUR MODEL’S PELVIC TILT Determine the tilt, or axis, of the model’s pelvis by carefully observing that conceptual line through the lower third of the pelvis. Is there a tilt, or is the line straight? One of the best ways to find the proper tilt is to look for the two ASIS points on the pelvis.
Above: The essential first steps of establishing basic proportions: First, find your eye level. Then make marks for the top, bottom, and middle of the figure. And finally, mark the pelvic tilt of the model.[/vc_column_text][thb_gap height=”22″][/vc_column][vc_column width=”1/3″][vc_widget_sidebar sidebar_id=”home_1″][/vc_column][/vc_row][vc_row][vc_column][vc_column_text][ultimate_author_box user_id=”139″ template=’uab-template-12′][/vc_column_text][thb_gap height=”10″][/vc_column][/vc_row]
Responses