Figurative Artist Handbook: Anatomy Within the Blocks
Drawing New York is thrilled to partner with artist Rob Zeller, author of The Figurative Artist’s Handbook to offer our members a ‘serialized digest’ of his extremely popular and beautiful book. Each week we will bring you new topics and techniques relating to figure drawing so check back often.
Anatomy Within the Blocks
Great figure drawings are informative. They describe a movement from a basic description of the overall geometry of the mass to a more general anatomical description, and then to an even more specific explanation of where the light and shadow fall on those forms. The Block Concept helps with that task by organizing the very complicated anatomy of the torso into simplified geometrical shapes. There are three major blocks: the head, rib cage, and pelvis. However, the arms and legs can be conceived according to the Block Concept as well, so I include them here.
On the surface of each one of those blocks fall important landmarks. Learn the block and you learn the landmarks that go with it. These landmarks will, if carefully observed, reveal what the boxes, and thus the skeleton, are doing. Memorizing these landmarks is a great help to understanding any pose the model may take.
Click Here to Order The Figurative Artist’s Handbook
The skeleton, the foundation upon which the figure is built, has many joints. In the beginning of a drawing, only the twelve major ones concern us. The main piece of knowledge you are acquiring is where important bones meet. This “meeting” of bones allows for movement in the figure. Know the location of the twelve main joints and you will be on your way to understanding movement within the figure.
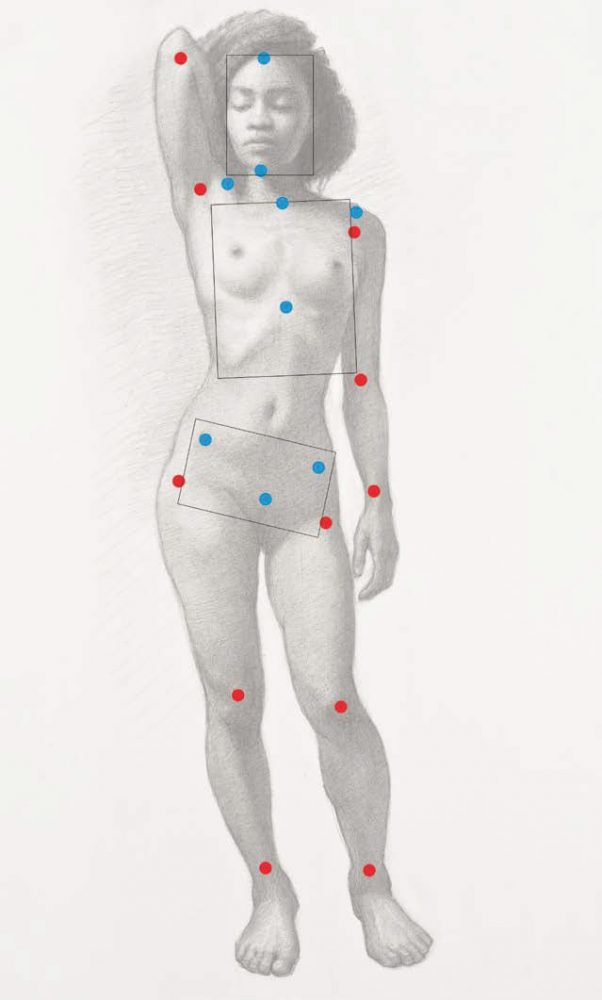 If you look at the diagram opposite, you will see a figure drawing with the three boxes, landmarks (in blue), and major skeletal joints (in red) clearly mapped out. You should memorize the location of all of the key references on the figure. It helps greatly!
We will now discuss each of the three building blocks along with the landmarks and joints that accompany them. In this system, the arms and legs are treated as appendages. We will discuss the joints that fall on them also. Follow along with the diagram to see where these fall on the figure.
HEAD BLOCK The frontal view of the head has two key landmarks: Top of forehead: The peak of the frontal eminence. Chin: The mental protuberance (the small notch on the front of the chin).
RIB CAGE BLOCK The frontal view of the rib cage has three key landmarks, one of which appears on both sides of the body: Pit of neck: The top of the manubrium. Acromion process: Where the clavicle rests adjacent to the top part of the scapula. This appears on both sides of the body. Xiphoid process: This is a triangular tip at the bottom of the sternum, which forms the apex of the thoracic arch, at the top of the abdomen.
ARM BLOCKS The frontal view of each of the arms has three key joints. These landmarks are positioned according to the laws of bilateral symmetry: Shoulder joint: Where the head of the humerus (upper arm bone) meets the glenoid fossa of the scapula. (No, you can’t see this joint on the surface. But you should know where it is, and also learn the components that attach themselves to it. When it moves, they move.) Elbow: Where the humerus meets the radius and the ulna (the two lower arm bones). Wrist: A complicated meeting of the radius and ulna with the small bones of the base of the hand, the carpals. top of forehead chin pit of neck acromion process shoulder joint elbow anterior superior iliac spine (ASIS) wrist great trochanter tibial tuberosity ankle
PELVIC BLOCK The frontal view of the pelvis has three key landmarks, two of which appear on both sides of the body: Anterior superior iliac spine (ASIS): The front points on either side of the spine of the pelvis. Pubic symphysis: The junction of the bone of the lower portion of the pelvis, just above the genitals. Great trochanter: The juncture of the shaft of the femur with the neck that inserts into the pelvis.
LEG BLOCKS The frontal view of each of the legs has three key joints. As with the arm blocks, these landmarks are positioned according to the laws of bilateral symmetry: Knee: The meeting of the femur (the long bone of the upper leg) with the tibia and fibula (smaller bones of the lower leg). The joint is covered by the patella, a small, disk-shaped bone that protects the area of the meeting of the upper and lower bones. Tibial tuberosity: The front notch on top of the condyle of the tibia (bottom of the knee, below the kneecap). When the leg is bent, this can be a helpful landmark to show the location and direction of the lower leg. Ankle: This is formed by three bones, but on the surface, we perceive only two bumps. The bump on the inside is called the medial malleolus, which forms the base of the tibia. The outside bump is called the lateral malleolus and forms the base of the fibula.
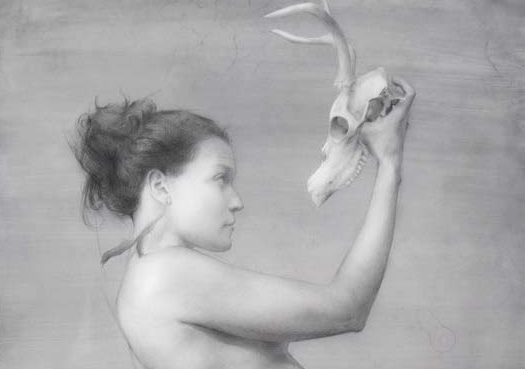
Top Image: Elizabeth Zanzinger, Fallon III, 2015, graphite on Mylar, 18 x 14 inches (45.7 x 35.6 cm) The power and rhythm of the lines the model created resonated with the artist. To Zanzinger, her body echoed the remnants of the animal skull she’s holding.
Responses